Sunday, December 18, 2016

Siding the walls with some bevel

With thought to overall weight, I decided to use cedar bevel siding for the exterior, stained for a nice brownish natural cedar tone. I used stainless steel siding nails, which for the most part didn't split the siding. Part way through this process, I got a new hand rotary saw - a dremel saw, which was really easy to work with and significantly improved the time-consuming task of cutting siding panels to size, even adjusting cuts once the panels were up. I previously was using a more beefy rotary saw that required two hands to operate and was much more suited to cut 2x4's... Using the right tools for the job makes a huge difference!

I wanted to stain the panels on the ground first and then put them up... but in the end, was racing against the weather, and so just cut them and nailed them up until an entire wall was finished, then stained in place. By the end, I was trying to stain in temps hovering around freezing which is not ideal - both for my hands and for the stain - which it says should be applied at temps above 50deg - oops... doesn't look too bad though...


Placement and neighbors

I specifically wanted to situate the treehouse somewhere where it wouldn't intrude too much on my neighbors' privacy. This is good for everyone involved. 
The south side of the treehouse faces our backyard neighbor's house, so I didn't put any windows on that wall (even though it was south facing). Also, the front entry wall is behind the hemlocks, whose boughs hide the treehouse from the street, even in winter. I think in the end it worked out well and hopefully is not so noticeable and obtrusive to the neighbors...


Gentlemen testing

Every once in a while, it's good to assemble a group of your friends, of various shapes and sizes, to test the structural fidelity of the house. This is fun for everyone involved (as long as the house doesn't collapse of course)... these guys are all grizzled veterans of the Society for Acupuncture Research who were staying with us for a board retreat... thanks guys.

Some ladders required

Ultimately, around the hemlocks and in some of the extreme corners, I needed to use a ladder to get to the panel edges and screw in the special bolts that keep the panels from flying away in a strong wind, and keep rain from entering the entry hole.

While the panels were reddish in color, for some extra light inside the treehouse I mixed in clear polycarbonate panel pieces to make kind of a skylight - this also lets you see the trees from inside the treehouse. It turned out be a nice effect. When mixing panels like this, you have to layer them the right way so that water coming down from the top panel didn't make its way under an overlay panel below it. Something to keep in mind...

For some of the specialized screws, especially up high by the ridge beam (which required a special ridge cap over the adjoining panels that met at the gable apex), I used a different technique for getting these screws in place. I placed the screw head directly into the chuck - i.e. no star drive or phillips head drive... I would tighten the chuck just enough so that once it was screwed in place I could just snap down and the drill would come off the screw. This allowed me to climb up high, hold myself steady on a tree or treehouse wall with one hand, and drive in the screw with a single hand. Worked great once I figured this out :)

Roof logistics

Getting up and around the treehouse to put up the rafters and roofing led to some "contemplation." Since the roof tilted only 40deg or so from vertical, I really didn't want to be climbing around up there unprotected. That meant that I wanted to be able to assemble the roof as much as possible from inside the treehouse. Up on a step-ladder if at all possible. With this in mind, I decided the simplest approach would be to use super light, 2-foot wide, corrugated polycarbonate panels for the roof. I was originally thinking of using sheathing with cedar shingles, but this would have required a lot of scrambling up on the roof. In contrast, the panels are fairly cheap, relatively nice looking, long-lasting, easily sourced from local big-box, and could be assembled one after the other from inside the treehouse (mostly). I had some visitors from the local squirrel family (who live in a near-by oak) come by to inspect my work (see photo).


The polycarbonate panels do require special screws that have a rubber element under the cap to keep it water-proof. Also they ideally need this plastic undulating snap-in support rail that rests on purlins (2x3's) which I had to put up orthogonally to the rafters...


Gable-gable... trying to get the roof going before thanksgiving

We're catching up quick to real-time here on the blog. Once the fall really set in, it felt like a race to get as much buttoned-up as I could before the snows came. Next up was the roof, and I wanted to make sure the south side got up as soon as possible, as thats the side which was slightly tilted and accumulated water with each (rare) rainstorm (we're in the middle of a drought).

Keeping to the general theme of the larger terrestrial home that the treehouse hovers around, the roof design included a gable, centered on the front (west facing) entry wall. The ridge beam at the top of the gable would go from the curved wall to the front entry wall. Alas, getting everything set-up ended up with a few inches displacement for the apex, so i needed to double-up and offset the 2x6 ridge beam. The beam itself fell into a notch created by doubling up vertical 2x4's in both the curved and entry walls, then cutting away half of the inside edge of each of the these 2x4's down about 3 inches, creating a nice 2x notch for the ridge beam to fall into. Maybe more clear with photos... The rafters were spaced based on the needs of the polycarbonate roofing I was going to use. These were bird mouth notched where I could and screwed in / backed up with hardware where the rafters had to go flush with the ridge beam. Since I knew the roofing was going to be super light (corrugated polycarbonate 2-foot wide panels), I knew these didn't need to be overdone. But still needed to support potentially heavy snow-weight.

Monday, November 28, 2016

Righting the wrong

It's never going to be perfect. The platform was level, the wall was plumb... but then the knee brace began to sink (a bit), and the wall started to tilt. While it's not a structural problem, all the angles and distances go off, and you're left trying to compensate with the siding, roof, trim, etc. What to do? The solution ended up being "racking" the wall back to near-plumb and keeping it there with a screwed in 2x4 (in the photo). Great idea by Andrei (my niece's husband), who with my brother-in-law Don, helped with the solution. Once all the walls were up and screwed together, the fix held. Now the brace is off, and the platform is still a bit dippy at the furthest corner. There's accumulated water with every rainstorm, but now I got the roof and siding up. It's manageable and in the end, you can barely tell without rolling a marble across the floor ;) With treehouse construction, you learn a little flexibility - not a bad lesson in life....

Saturday, November 26, 2016

Curved wall - part 2

After attaching the studs to the curved bottom plate, I used some plastic pieces nailed to the inside (larger radius) side of the wall to keep it together. This was how I was able to hoist it up onto the platform from the ground below. Once up on the platform, I hand-cut beveled siding pieces to connect adjacent  studs. I love the effect! It looks like armadillo scales, which is kinda cool, but alas, these scales will remain invisible, since they face the oak tree on the exterior side of the wall. The photos show the process before i attached the wall to its adjacent neighbor walls... Thanks to Nadia for helping keep the studs in line :)


The curved wall – part 1

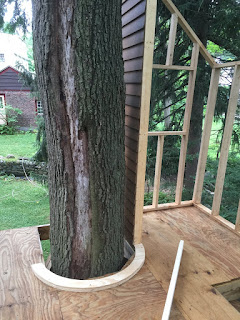
Probably the most challenging wall of the whole project was the curved wall that went around the main oak tree. Figuring out how to make this was a process, especially with the gabling and curved helical section on the top part – which never really did get figured out. Spent some time with trigonometry calculations, which was fun but ended up being useless - probably needed to work with 3D helical sections... For the bottom I ended up cutting two copies of a circular arc out of ¾” plywood, put them together, and that was the bottom plate… as you see in the photo. For the top, well... approximating stud to stud, shaving down some 2x4's here and there... it came together in the end ;) Hey, the roof's pretty light!


Slowing down


Some walls need to go up as a finished product. These are the walls that wrap around the oak tree and, once up, I’d have no way to get at their exterior, put up siding, etc. This meant that not only did the wall need to be framed on the ground, but the siding needed to be nailed up and stained prior to hoisting the wall and screwing it to its neighbors and floor. This really slowed things down for obvious reasons… but there was really no other way I think. (mom approves, by the way ;) )

Structural engineering consult


One of my joys in building this treehouse when I did was having my mom and dad close by (they had recently moved to the area) so they could swing over and look over the progress. My father was a structural engineer and loved checking over all the beams under the treehouse, supporting the platform. Fun for us both... (yeah, yeah, my selfie techniques need some more work)

Getting by with a little help from my friends


While some of the walls I could push up onto the platform myself, others required two able-bodied lumberjacks to hoist them up, or place into position before screwing them down. My local Norwegian friend, Dan-Mikael, was more than happy to assist in such badassery, and lived down the street… It didn’t take a lot of his time, but in key moments his help was invaluable.


Framing the walls… the treehouse starts to take shape


Once the walls started to get framed out and hoisted up onto the platform, it really started to feel like a treehouse was finally coming together. The first wall (pictured here) which was planned for the south side was built with nails. In retrospect I should have used exterior-grade screws, as I did with all the other walls – it would have been easier, faster to build square and by the time I finally got the roof over it, the nails were starting to rust. Oh well… Some people advocate building the walls up on the platform itself so you don’t need to hoist the walls up, while others suggest building them on the ground with lots of space all around, and then hoisting them up. As it was, my footprint was pretty small, so once one wall was up, I really couldn't build too many others, plus I had removed my pulley system before the previous winter and never got it set up again, so…. I did most of the wall construction down on the ground.